Place virtual content with VPS2
This guide explains how to place virtual content in an AR scene using an anchor.
Virtual content is any digital object rendered in AR, such as a 3D model, label, or visual effect. To appear in the correct location and remain stable as the user moves, it must be attached to an anchor.
An anchor defines a tracked position and orientation in the real world. Attaching virtual content to an anchor allows the AR system to keep that content aligned with the environment over time.
With VPS2, anchors can be positioned relative to real-world locations, allowing you to place content consistently across sessions and devices.
In this guide, you will:
- Track an anchor in the AR scene
- Attach virtual content to the anchor
- Verify that the content remains stable as the AR session updates
Different placement approaches define how content is created, what data is saved, and how that content is restored later. The next section helps you choose the approach that best fits your application.
Prerequisites
Before you start, make sure you already have:
- a project with NSDK installed and a basic AR scene set up
- a Site in Scaniverse for the workflows that use a Site anchor, imported Site mesh, or Site-derived content
For setup details, see Setting Up the Niantic SDK, Setting up an AR Scene, and First Localization with NSDK.
Choose how to place virtual content
There are multiple ways to place virtual content in an AR scene. Each approach defines how content is positioned, how it behaves over time, and what data is stored so it can be reused.
You can use one or more approaches in the same app, depending on your use case. For example, one feature might place persistent content at a real-world location, while another allows users to place temporary content during a session.
Key considerations
- Using multiple approaches - Different features in your app can use different placement approaches. You do not need to choose only one for the entire application.
- Persistence - Each approach defines what data, if any, is stored for reuse, and whether that reuse is limited to the current session or can work across sessions and devices:
- VPS-based placement stores data relative to a real-world location, which can allow content to appear in the same place across sessions and devices.
- Local placement can keep content stable during the current session, including user-driven placement such as hit tests, but it does not necessarily restore to the same real-world position later unless your app persists additional data.
Use the following table to compare the available approaches based on when to use them, what data they save, and how each one restores content later.
| Approach | Best for | Saved data | Restoration |
|---|---|---|---|
| Place content relative to an anchor | You localize to a Site from its Site anchor payload, then want content to stay attached to that tracked anchor across sessions. | The Site anchor payload plus each content item's anchor-local transform. | Re-localizes to the same Site anchor and reapplies the saved anchor-local transform. |
| Place content using geo coordinates | Content is authored at a known latitude, longitude, and altitude. | Geolocation data such as latitude, longitude, altitude, and optional heading. | Reconstructs placement from geospatial coordinates and reapplies the resulting pose. |
| Place content with imported Site mesh | You want to preview or author content in the Unity Editor against a Site mesh. | Imported Site assets plus content authored under the ARLocation hierarchy. | Re-localizes to the imported Site and reuses the authored local transforms at runtime. |
Best practices
- Use Place content relative to an anchor for content that should stay attached to a tracked Site anchor and be restored from anchor-local pose data.
- Use Place content using geo coordinates for content authored at a known latitude, longitude, and altitude.
- Use Place content with imported Site mesh for Unity Editor workflows that author content visually against a Site mesh.
Place content relative to an anchor
Use this approach when the user decides where content should appear during a localized session. Save the content's local transform relative to the anchor, then apply that same local transform again the next time the anchor is tracked.
The primary VPS2 flow in NSDK 4.x is to track a Site anchor from its payload with ARVps2Manager, keep the returned ARVps2Anchor, and place content relative to that anchor.
Follow this workflow to place, save, and later restore content relative to a tracked Site anchor:
-
Create a Site in Scaniverse, then get its Site anchor payload. The payload identifies the Site anchor you will track again in later sessions. You can get the anchor payload in either of these ways:
- Copy the Site's default anchor payload from Scaniverse when you are testing with a known Site.
- Alternatively, use the Sites API at runtime and let the user choose a Site.
-
Track the Site anchor with TryTrackAnchor. Keep the returned ARVps2Anchor, because your content will be attached relative to it. This code is introduced in step 1 of the following runnable example.
-
Wait until the anchor reaches
Tracking. This prevents you from placing content against an unstable anchor pose. This check is introduced in step 1 of the following runnable example. -
When the user chooses a placement pose, instantiate the content and parent it under
anchor.transform. Parenting the content under the tracked anchor keeps it aligned as VPS2 updates the anchor pose. This code is introduced in step 1 of the following runnable example. -
Save the Site anchor payload together with the content's
localPositionandlocalRotation. Those values are what let you restore the same content relative to the same Site anchor later. This code is introduced in step 1 of the following runnable example. Expand the following example if you want a runnable Unity component that implements this workflow end to end, including tracking the Site anchor, placing content under it, and saving the anchor-relative pose for later restoration.Runnable example: Place content relative to a tracked Site anchor
The code comments in this example refer to the workflow steps in the previous list. To wire this example into a runnable scene, do the following:
This example already includes a small set of
Debug.LogandDebug.LogErrorstatements that you can use during testing. Open the Unity Console while the scene is running to confirm that tracking starts, the placement succeeds, and the pose is saved.To keep this example runnable without authentication, use a valid Site anchor payload that you already obtained earlier, then paste that string into the
Anchor Payloadfield on theTrackSiteAnchorAndPlaceContentcomponent in the Unity Inspector.-
Create a new Unity script file named
TrackSiteAnchorAndPlaceContent.cs, then replace its contents with the following code: The following example defines the component that tracks a Site anchor, places content under that anchor, and saves the anchor-relative pose:using System;
using NianticSpatial.NSDK.AR;
using NianticSpatial.NSDK.AR.PersistentAnchors;
using UnityEngine;
using UnityEngine.UI;
using UnityEngine.XR.ARSubsystems;
[Serializable]
public struct SavedTrackedContent
{
public string anchorPayload;
public Vector3 localPosition;
public Quaternion localRotation;
}
public class TrackSiteAnchorAndPlaceContent : MonoBehaviour
{
[SerializeField] private ARVps2Manager _arVps2Manager;
[SerializeField] private string _anchorPayload;
[SerializeField] private GameObject _contentPrefab;
[SerializeField] private Button _placeButton;
[SerializeField] private Camera _arCamera;
private ARVps2Anchor _trackedAnchor;
private string _trackedAnchorPayload;
private void OnEnable()
{
_placeButton.onClick.AddListener(OnPlaceButtonClicked);
if (!string.IsNullOrWhiteSpace(_anchorPayload))
{
TryTrackSiteAnchor(_anchorPayload);
}
}
private void OnDisable()
{
_placeButton.onClick.RemoveListener(OnPlaceButtonClicked);
}
public bool TryTrackSiteAnchor(string anchorPayload)
{
// Workflow step 2: track the Site anchor from its payload.
if (!_arVps2Manager.TryTrackAnchor(anchorPayload, out _trackedAnchor))
{
Debug.LogError("TrackSiteAnchorAndPlaceContent: TryTrackAnchor failed.");
return false;
}
// Workflow step 2: keep the payload so you can save it with the content pose.
_trackedAnchorPayload = anchorPayload;
return true;
}
private void OnPlaceButtonClicked()
{
// Workflow step 3: wait until the tracked anchor is stable before placing content.
if (_trackedAnchor == null || _trackedAnchor.trackingState != TrackingState.Tracking)
{
return;
}
// Workflow step 4: place the content in world space, then parent it under the tracked anchor.
var worldPosition = _arCamera.transform.position + _arCamera.transform.forward;
var worldRotation = Quaternion.LookRotation(_arCamera.transform.forward, Vector3.up);
var content = Instantiate(_contentPrefab, worldPosition, worldRotation);
content.transform.SetParent(_trackedAnchor.transform, true);
// Workflow step 5: save the Site anchor payload plus the content's anchor-local pose.
var savedPose = new SavedTrackedContent
{
anchorPayload = _trackedAnchorPayload,
localPosition = content.transform.localPosition,
localRotation = content.transform.localRotation
};
SavePose(savedPose);
}
private void SavePose(SavedTrackedContent savedPose)
{
Debug.Log("TrackSiteAnchorAndPlaceContent: content placed and pose saved.");
// Store the anchor payload plus the local pose in PlayerPrefs, a file, or your backend.
}
} -
Create a clean test scene for this example. In a fresh Unity scene, add the following objects from the
Hierarchymenu:- in the
Hierarchycontext menu, chooseXR > AR Session - in the
Hierarchycontext menu, chooseXR > XR Origin (Mobile AR) - create an empty
GameObject, name itAR Input Manager, then useAdd Componentto addAR Input Manager - in the
Hierarchycontext menu, chooseUI > Canvas - under
Canvas, chooseUI > Button - an empty
GameObjectnamedTrackedContentManagerThen: - add ARVps2Manager to
XR Origin - add
TrackSiteAnchorAndPlaceContenttoTrackedContentManager - add your new scene to
Build Profiles > Scenesand move it ahead ofHomeso the app opens directly into it on device
- in the
-
Select the
GameObjectthat has theTrackSiteAnchorAndPlaceContentcomponent, then assign the five serialized fields in the Inspector:- Drag the object that has ARVps2Manager into the
ARVps2Managerfield. In thensdk-samples-csharpproject, dragXR Origininto theARVps2Managerfield. - Paste a valid Site anchor payload into the
Anchor Payloadfield. In thensdk-samples-csharpproject, paste it into the same field onVPS2LocalizeDemoManager. - Drag your AR camera into the camera field. In the
nsdk-samples-csharpproject, dragMain CamerafromXR Origin > Camera Offset > Main Camerainto the camera field. - Create or choose the UI button that should trigger placement, then drag it into the button field. In the
nsdk-samples-csharpproject, addTrackSiteAnchorAndPlaceContenttoVPS2LocalizeDemoManager, create aButtonunderCanvas, and drag that new button into the button field. - Drag the prefab asset you want to place into the content field. For a fast visible test object, create
Hierarchy > 3D Object > Cube, then drag thatCubeinto your project to create a prefab asset.
- Drag the object that has ARVps2Manager into the
-
Run the scene and wait for the anchor to reach
Tracking.OnEnable()callsTryTrackSiteAnchor(_anchorPayload)automatically when theAnchor Payloadfield is not empty:TryTrackSiteAnchor(_anchorPayload);View the anchor status in your device logs by logging
_trackedAnchor.trackingStatewhile testing. Wait until the anchor status reachesTrackingbefore pressing the button you created in step 3. The on-screen validation order for this runnable example is:- launch the scene on device
- wait for the Site anchor to reach
Tracking - press the placement button once Build to iPhone or Android to validate tracked-anchor placement with a real Site payload.
-
-
Restore the content in a later session. Track the same Site anchor again, then reapply the saved local transform so the content returns to the same real-world location. This code is introduced in steps 1 through 6 of the following runnable example. Expand the following example if you want a runnable Unity restore component for the same workflow. Test it in a second run after you already placed content once and captured the saved payload plus local transform values from step 5.
Runnable example: Restore content relative to a tracked Site anchor
The code in this example implements the restore phase from step 6 of the previous list. To wire it into the same scene and test it, do the following:
-
Create a new Unity script file named
ContentRestore.cs, then replace its contents with the following code: In thensdk-samples-csharpproject, place the script inNsdkSamples/Assets/Samples/PersistentAR/Scripts. The following example defines the component that tracks the saved Site anchor again and reapplies the saved local pose when tracking is stable. This script reuses theSavedTrackedContentstruct that you already created inTrackSiteAnchorAndPlaceContent.csin step 5:using NianticSpatial.NSDK.AR;
using NianticSpatial.NSDK.AR.PersistentAnchors;
using UnityEngine;
using UnityEngine.XR.ARSubsystems;
public class ContentRestore : MonoBehaviour
{
[SerializeField] private ARVps2Manager _arVps2Manager;
[SerializeField] private GameObject _contentPrefab;
[SerializeField] private SavedTrackedContent _savedContent;
private ARVps2Anchor _trackedAnchor;
private bool _contentRestored;
public bool BeginRestore()
{
var started = _arVps2Manager.TryTrackAnchor(_savedContent.anchorPayload, out _trackedAnchor);
Debug.Log($"ContentRestore: BeginRestore started = {started}");
return started;
}
private void Update()
{
if (_contentRestored || _trackedAnchor == null || _trackedAnchor.trackingState != TrackingState.Tracking)
{
return;
}
var content = Instantiate(_contentPrefab, _trackedAnchor.transform);
content.transform.localPosition = _savedContent.localPosition;
content.transform.localRotation = _savedContent.localRotation;
_contentRestored = true;
Debug.Log("ContentRestore: content restored under tracked anchor.");
}
} -
Add
ContentRestoreto the same scene object that already stays active while VPS2 localization is running. In a fresh Unity scene, add it to the sameTrackedContentManagerGameObjectthat already holdsTrackSiteAnchorAndPlaceContent. In thensdk-samples-csharpproject, the closest reference point isVPS2LocalizeDemoManagerinNsdkSamples/Assets/Samples/PersistentAR/Scenes/VPS2Localization.unity. -
Select the
GameObjectthat has theContentRestorecomponent, then assign the three serialized fields in the Inspector:- Drag the object that has ARVps2Manager into the
ARVps2Managerfield. In thensdk-samples-csharpproject, dragXR Origininto theARVps2Managerfield. - Drag the same prefab asset you used during placement into the content field. In the
nsdk-samples-csharpproject, use the same prefab you assigned toTrackSiteAnchorAndPlaceContent. - Enter the saved
anchorPayload,localPosition, andlocalRotationinto theSaved Contentfield. For a real restore test, use the values you captured from the successful placement run in step 5.
- Drag the object that has ARVps2Manager into the
-
Add a small helper script that starts the restore flow when the scene loads. Create a new Unity script file named
RestoreStarter.cs, then place it on the sameTrackedContentManagerobject asContentRestore.The following script example starts the restore flow automatically when the scene loads:
using UnityEngine;

public class RestoreStarter : MonoBehaviour
{
    [SerializeField] private ContentRestore _contentRestore;

    private void Start()
    {
        _contentRestore.BeginRestore();
    }
} -
Select the
GameObjectthat has theRestoreStartercomponent, then drag theContentRestorecomponent into theContent Restorefield. For the restore run, disableTrackSiteAnchorAndPlaceContentso the scene does not place more content when it starts. -
Build to iPhone or Android and run the scene again at the same Site. Do not press the placement button in this run. Wait for the anchor to reach
Tracking. The on-screen validation order for this runnable example is:- launch the restore scene on device
- wait for the Site anchor to reach
Tracking - do not press any placement button in this run, because
RestoreStarterbegins restore automatically The expected result is that the content is recreated automatically under the tracked anchor and returns to the same real-world location.
-
TryCreateAnchor is not the default flow for this workflow. The usual path is to track a Site anchor from its payload with TryTrackAnchor and place content relative to that anchor. Creating an additional anchor is a more advanced case, for example if you need a separate anchor far away from the default Site anchor.
Place content using geo coordinates
Use this approach when content should appear at a fixed latitude, longitude, and altitude. Use the latest VPS2 localization snapshot to relate AR space to the real world, then convert your target geolocation into an AR pose with TryGetPose().
Follow this workflow to place content from geo coordinates:
- Get the known latitude, longitude, and altitude for the real-world location where the content should appear. For example, these values might come from authored content data, a backend, or a fixed test location. For quick testing, use a known nearby coordinate from a maps app.
- Get the latest VPS2 localization from ARVps2Manager with TryGetLatestLocalization. The localization snapshot represents the current relationship between AR space and the real world. This code is introduced in step 1 of the following runnable example.
- Call TryGetPose with that localization, the target latitude, longitude, and altitude, and an EDN orientation quaternion (often Quaternion.identity when the target has no specific heading). When localization is available and the pose conversion succeeds, it returns the pose for that real-world location in AR space. This code is introduced in step 1 of the following runnable example.
- Apply the returned pose to your
GameObjectand keep updating it as VPS2 improves. Repeating this conversion lets the content stay aligned to the latest VPS2 estimate. This code is introduced in step 1 of the following runnable example.
The following example converts a fixed geolocation into an AR pose and applies that pose to a Unity GameObject as VPS2 improves:
Runnable example: Place content from geo coordinates
The code comments in this example refer to the workflow steps in the previous list. To wire this example into a runnable scene and test it, do the following:
-
Create a new Unity script file named
GeoPositionedObjectHelper.cs. In thensdk-samples-csharpproject, place the script inNsdkSamples/Assets/Samples/PersistentAR/Scripts. The following example defines the component that converts a fixed geolocation into aGameObjectpose. It includes a smallDebug.Logyou can watch on device to confirm that the helper is applying updated poses:using NianticSpatial.NSDK.AR;
using UnityEngine;
public class GeoPositionedObjectHelper : MonoBehaviour
{
[SerializeField] private ARVps2Manager _vps2Manager;
[SerializeField] private double _latitude;
[SerializeField] private double _longitude;
[SerializeField] private double _altitude;
void Update()
{
// Workflow step 2: get the latest VPS2 localization snapshot.
if (!_vps2Manager.TryGetLatestLocalization(out var localization))
{
return;
}
// Workflow step 3: convert the target geolocation into an AR pose.
if (_vps2Manager.TryGetPose(
localization,
_latitude,
_longitude,
_altitude,
Quaternion.identity,
out var pose))
{
// Workflow step 4: apply the latest pose to the GameObject.
gameObject.transform.SetPositionAndRotation(
pose.Pose.position,
pose.Pose.rotation);
Debug.Log("GeoPositionedObjectHelper: applied latest pose to GameObject.");
}
}
} -
Create a clean test scene for this example. In a fresh Unity scene, add the following objects from the
Hierarchymenu:- in the
Hierarchycontext menu, chooseXR > AR Session - in the
Hierarchycontext menu, chooseXR > XR Origin (Mobile AR) - create an empty
GameObject, name itAR Input Manager, then useAdd Componentto addAR Input Manager - in the
Hierarchycontext menu, choose3D Object > Cube, then rename itGeoContentThen: - add ARVps2Manager to
XR Origin - add
GeoPositionedObjectHelpertoGeoContentAdd your new scene toBuild Profiles > Scenesand move it ahead ofHomeso the app opens directly into it on device.
- in the
-
Select the
GameObjectthat has theGeoPositionedObjectHelpercomponent, then assign the serialized fields in the Inspector:- Drag the object that has ARVps2Manager into the
ARVps2Managerfield. In thensdk-samples-csharpproject, dragXR Origininto theARVps2Managerfield. - Enter the target latitude in the
Latitudefield. In thensdk-samples-csharpproject, enter the latitude for the real-world location you want to test. - Enter the target longitude in the
Longitudefield. In thensdk-samples-csharpproject, enter the longitude for the same real-world location. - Enter the target altitude in the
Altitudefield. In thensdk-samples-csharpproject, enter the altitude for that same location. If the latitude and longitude are correct butGeoContentis not visible, the altitude may be placing it too high or too low. Start with a large visible cube and adjust altitude until it enters view.
- Drag the object that has ARVps2Manager into the
-
Build to iPhone or Android and run the scene while VPS2 is localizing. This helper does not start VPS2 by itself. It only reads the latest localization after
ARVps2Managerhas started. The on-screen validation order for this runnable example is:-
launch the scene on device
-
let VPS2 localize normally
-
do not press a placement button, because this helper updates automatically during
Update()Watch the device logs for:The following text example shows the log message that confirms the helper applied an updated pose:
GeoPositionedObjectHelper: applied latest pose to GameObject.
The expected result is that the visible
GeoContentcube moves automatically into the AR pose for that real-world location and stays aligned as localization improves. Unlike the anchor-relative example, this flow does not use a placement button. -
When trying this out, set the latitude and longitude in the script to a location close to you for live testing or the playback scan for remote testing.
Place content with imported Site mesh
Use this Unity-only workflow when you want to preview and author content in the Editor against a Site mesh, then localize that same content at runtime with ARLocationManager and ARLocation.
Use this approach when you want to author content visually in the Unity Editor instead of placing it dynamically at runtime. Import the Site mesh and manifest from Scaniverse, create an ARLocation for that Site, and make your content a child of that tracked location object. At runtime, ARLocationManager tracks that Site again and reuses those same local transforms so the content appears in the same place relative to the imported mesh.
Figure: A cube authored under an ARLocation in the Unity Editor for a Site mesh workflow.
Follow this workflow to author content against an imported Site mesh:
- In Scaniverse, open the Site you want to author against and download its mesh asset package as a
.zipfile. Do not unzip it before import. - Drag the
.zipfile into the UnityAssetsdirectory in the Project window. Unity imports the package and creates a mesh.prefabplus a manifest.asset. - Create or open the Unity scene where you want to author content against the imported Site mesh.
In a fresh scene:
- In the
Hierarchycontext menu, chooseXR > AR Session. - In the
Hierarchycontext menu, chooseXR > XR Origin (Mobile AR). - Create an empty
GameObject, name itAR Input Manager, then useAdd Componentto addAR Input Manager. - In the
Hierarchycontext menu, choose3D Object > Cube, then rename it to something likeMeshAuthoredContentso you have a visible test object. - Add the new scene to
Build Profiles > Scenes, then move it ahead ofHomeso it opens directly on device during testing.
- In the
- Add ARLocationManager to
XR Origin. This is the manager that tracks the imported Site location at runtime and should be the main entry point for this workflow. - In the
ARLocationManagercomponent, useAdd AR Locationto create an ARLocation. Unity adds a new tracked location object to the scene for that manager to control. - Assign the imported manifest to that ARLocation.
Drag the manifest
.assetinto theAR Location Manifestfield in the Inspector. Unity updates theARLocationGameObjectname and tracking fields to match the manifest. If you want the imported mesh to appear at runtime, turn onInclude Mesh in Buildin theAR Location (Script)component. - Make your authored content a child of that ARLocation.
For a fast visible test, drag
MeshAuthoredContentunder theARLocation, then adjust its local position and scale in the Inspector so it appears where you want relative to the imported Site mesh. - Enable
Auto-Trackon ARLocationManager. WhenAuto-Trackis enabled, the manager starts tracking the active ARLocation when the component is enabled. For more control, see How to Use Location AR with Code. - Build to iPhone or Android and test at the real Site.
The expected result is that the imported Site mesh appears in the scene, the
ARLocationtracks at runtime, andMeshAuthoredContentreappears in the same place relative to that mesh without any placement button. For broader testing guidance, see Test Your Placement.
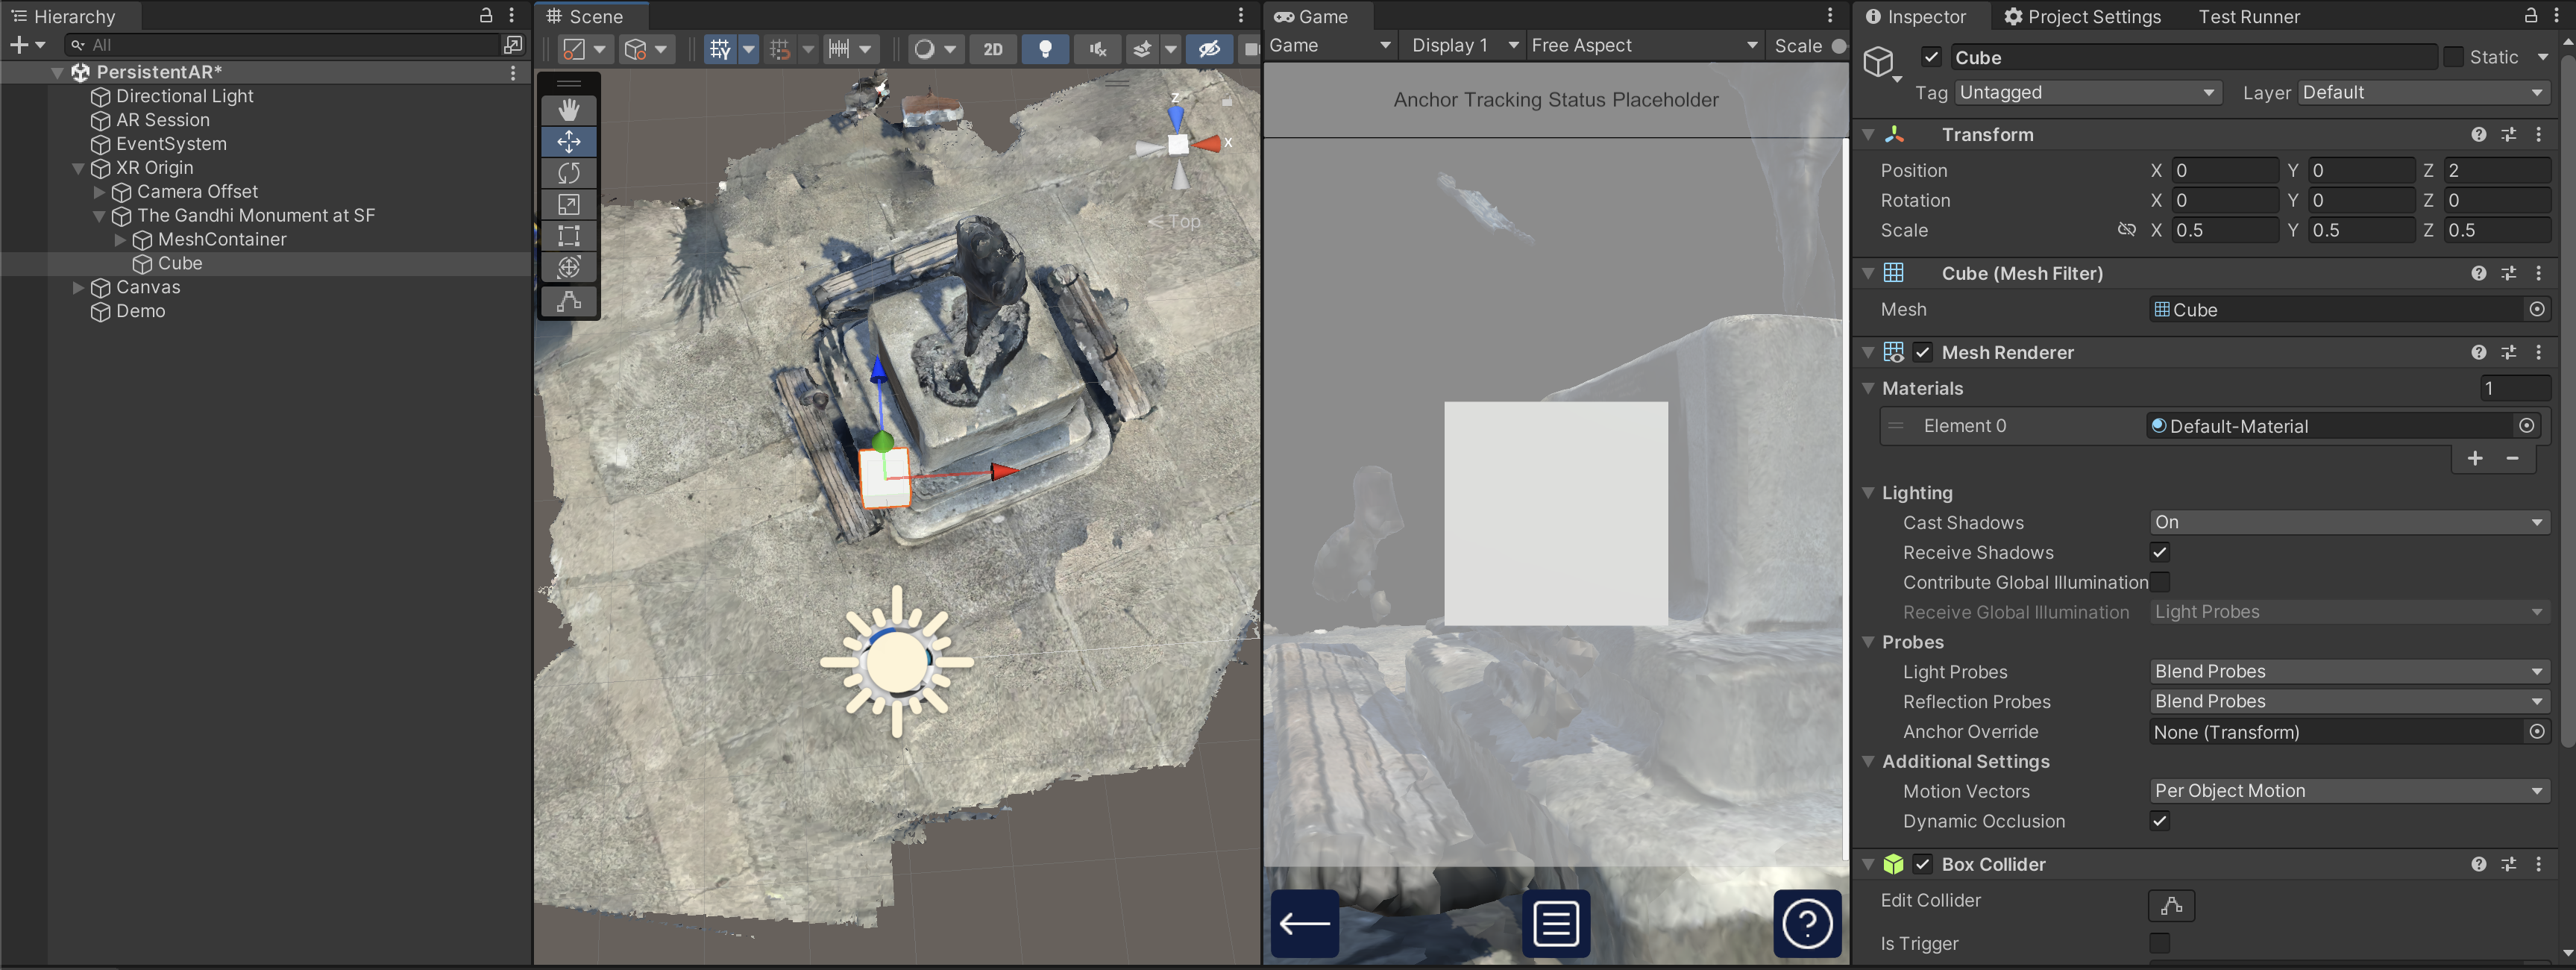
Figure: Content authored under an ARLocation in the Unity Editor.
When an ARLocation is tracked at runtime, it becomes associated with a tracked VPS2 anchor. All children of that ARLocation keep their local transforms relative to the tracked location, so make any authoring changes in local transform space.
Figure: Content authored under an ARLocation in the Unity Editor appears in the same relative place when that Site is tracked at runtime.
Test Your Placement
Use both Playback and on-location testing during development.
- Playback runs NSDK against a prerecorded AR session dataset instead of live camera input.
- Playback is useful when you want to iterate quickly, repeat the same test path, or debug placement behavior without traveling to the Site each time.
- Playback can help you test geo-coordinate placement and the later placement or restore logic if you already have a valid Site anchor payload.
- Playback does not provide a Site anchor or the default anchor payload, so it cannot validate the full tracked-anchor workflow by itself.
- Playback is still a simulation of a recorded session, so it is best for iteration and debugging rather than final validation.
- On-location device testing is still the most accurate way to confirm that content appears in the correct real-world place for the actual Site.
A practical test flow is:
- Use Playback to verify geo-coordinate placement, imported Site mesh workflows, or later placement and restore logic that already has a valid Site anchor payload.
- Build to a device and test on location to confirm the full tracked-anchor workflow and the final real-world position of the content at the Site.
To set up Playback, see How to set up Playback.